Pricing in ShadowPOS is generally set by price rules. In particular, for all trading card game catalogs you have enabled, values are referenced from popular US market data daily. Your rule-derived price is typically a percentage of that market value per condition of card. Manual pricing can be set per product / product variant, of course, and these are referred to as price overrides
ShadowPOS enables you to easily and intuitively set both buy and sell rules for virtually any range of products in your inventory. By default (in 'basic' mode), price rules are simply percetage-based per 'option' condition of catalog items, however, additional matching criteria an be added if desired. Utilize the Rule Manager to structure everything as needed to fit your store's pricing scheme.
Here we'll cover:
- Setting general price rules
- Viewing/arranging advanced price rules (via Rules Manager)
- Creating a price rule
- Condition rules (examples)
- Creating 'category line item' rules
- Creating static 'low value' product rules
- Creating 'purchase limit' rules
- Commonly used factors and functions for advanced rule formulas
Setting general price rules
For many use cases, the Catalog Pricing Rules page will accomplish most needs for a store's product pricing, as it follows a simple condition-based logic. By default, ShadowPOS sets a general rule for all catalogs that you can modify, add to, or remove from this page.
Visit Catalog > Price Rules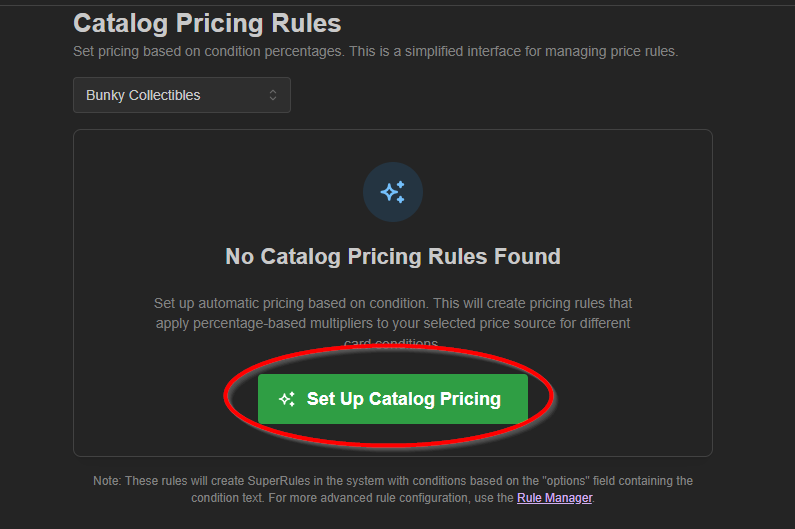
- Confirm store in dropdown box above (Rules will affect only this store)
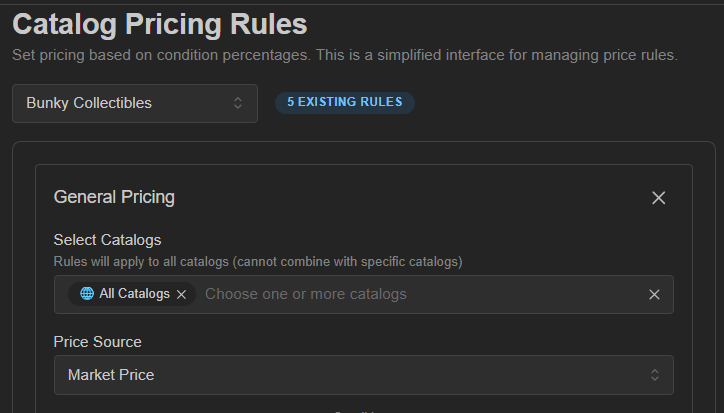
- Under 'General Pricing', choose a catalog for your pricing conditions to affect
- Choose the Price Source (from a current-day options of US 'Market', 'Direct Low', 'Low', and 'Mid' pricing models)
- Set your pricing percentage per condition option (source value X condition percentage = your price)
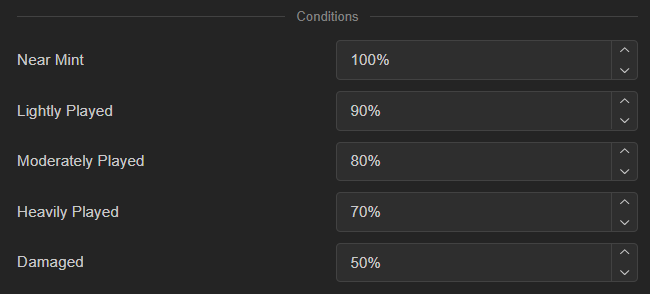
- (optional) select '+ Add Pricing Group' below and repeat steps 1-4 for additional rulesets. Useful if you need different pricing schemes for other catalogs.
- Click ' Create Rules' to save each of five rules (one per condition option) to your store's rule set.
Tip:
View the pricing details for a particular item in the point of sale by hovering over the top corner of any item 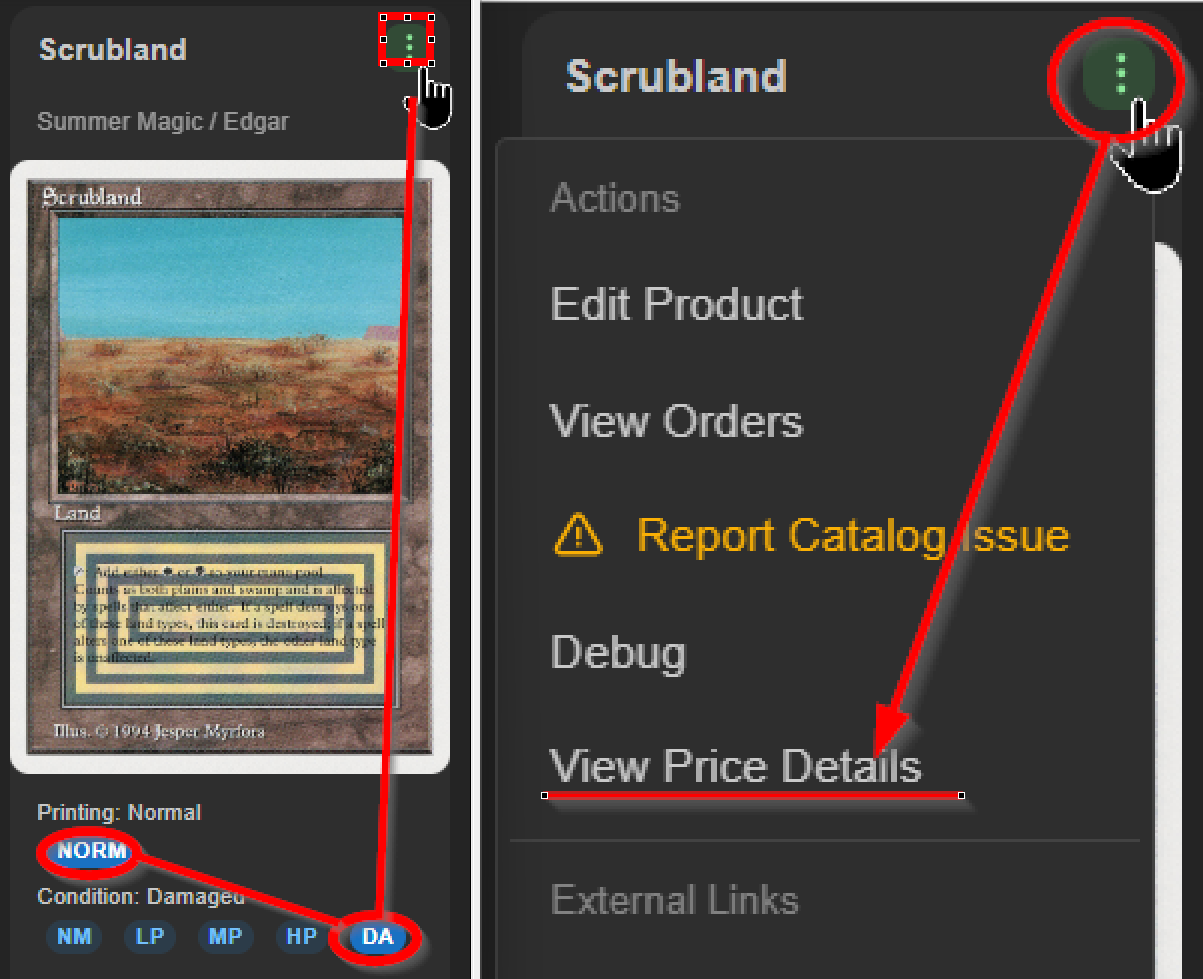
and clicking the Item Actions button > View Price Details
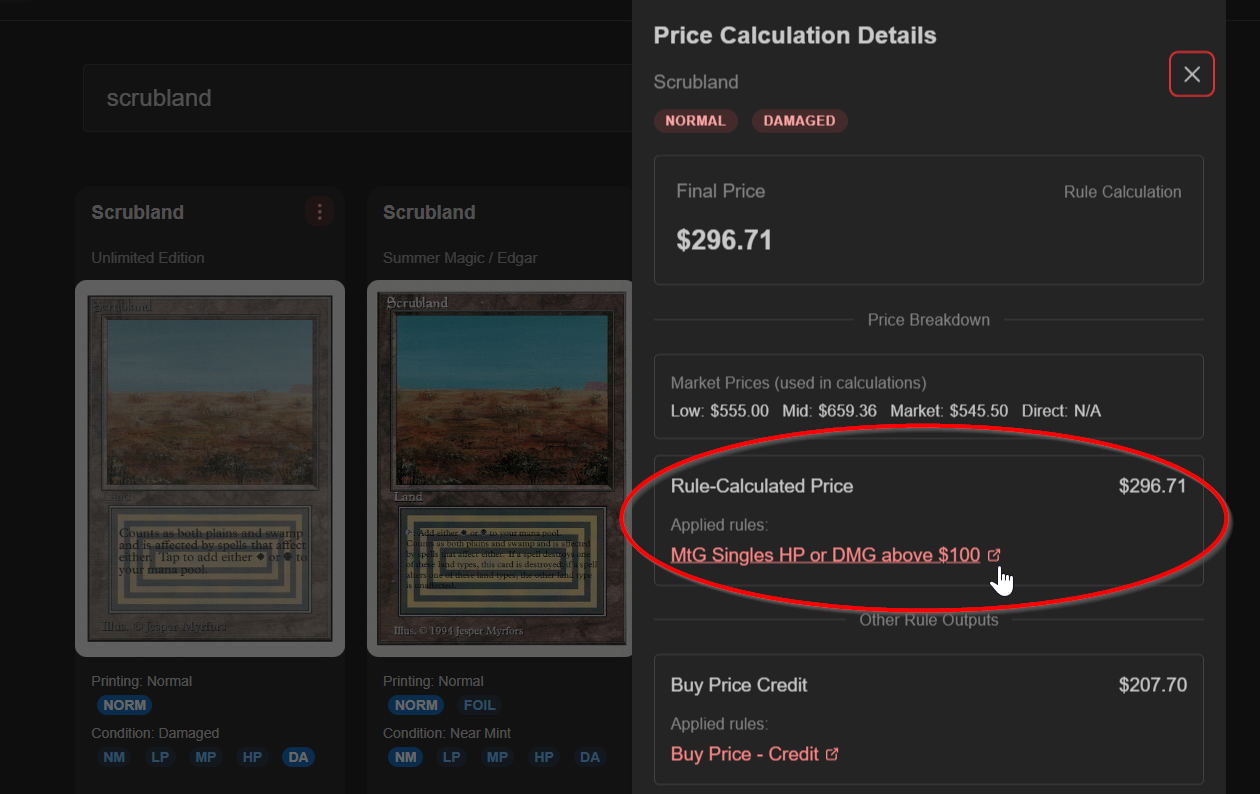
or by clicking the '(Rule)' link next to a variant's price (Products page)
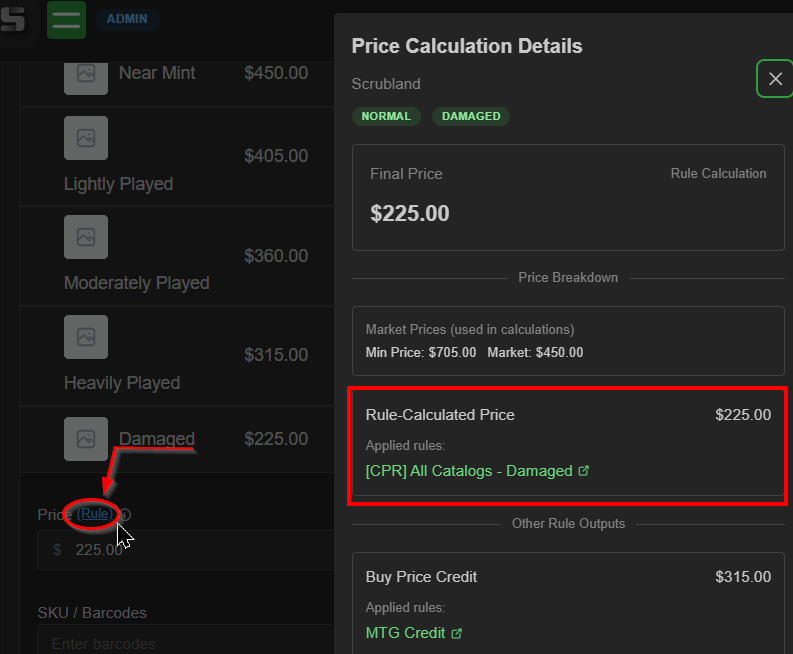
These are a couple methods to quickly reference which price rule is being used to calculate a price for a given product variant
Note:
The full logic hierarchy of pricing rules can be viewed in the Rules Manager (Menu > Catalog > Advanced Rules)
Viewing/arranging advanced price rules (Rule Manager)
The Rule Manager will allow you to view/modify/create increasingly unique rules that can affect a certain range or subset of products you need specific pricing for
Navigate to Menu > Catalog > Advanced Rules
Here you can view the hierarchy of all currently set price rules. Rule conditions near the top of the page are prioritized over conditions lower on the page. Click any rule to expand its editable info and logic pane.
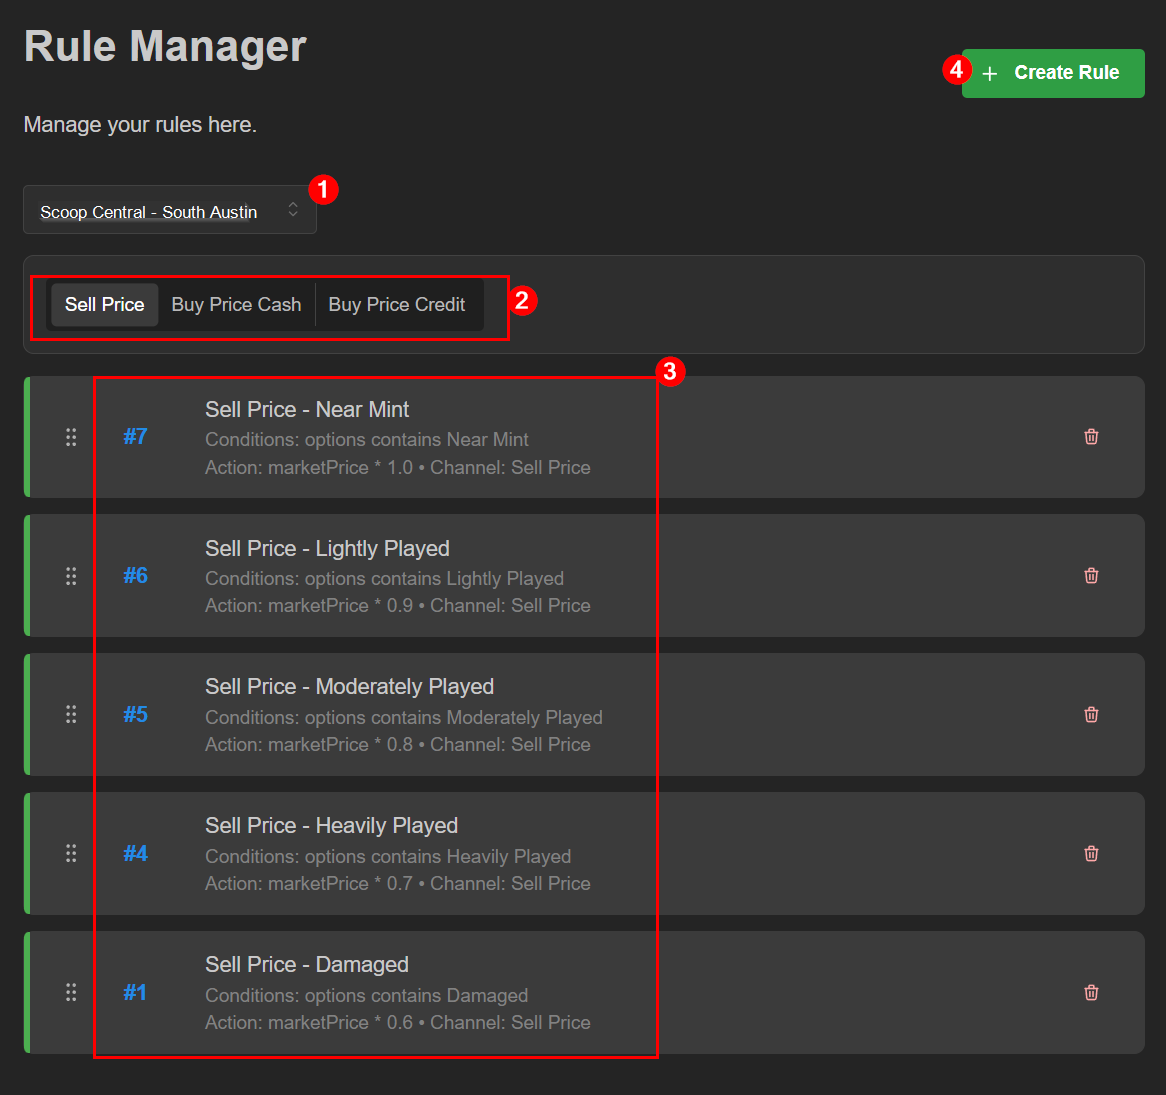
- Ensure proper store is selected from the above dropdown list
- Choose price channel to view its conditions hierarchy (Sell Price, Buy Price Cash, or Buy Price Credit)
- Arrange/View/Click a rule or
- Click +Create Rule to view/edit in the rule pane
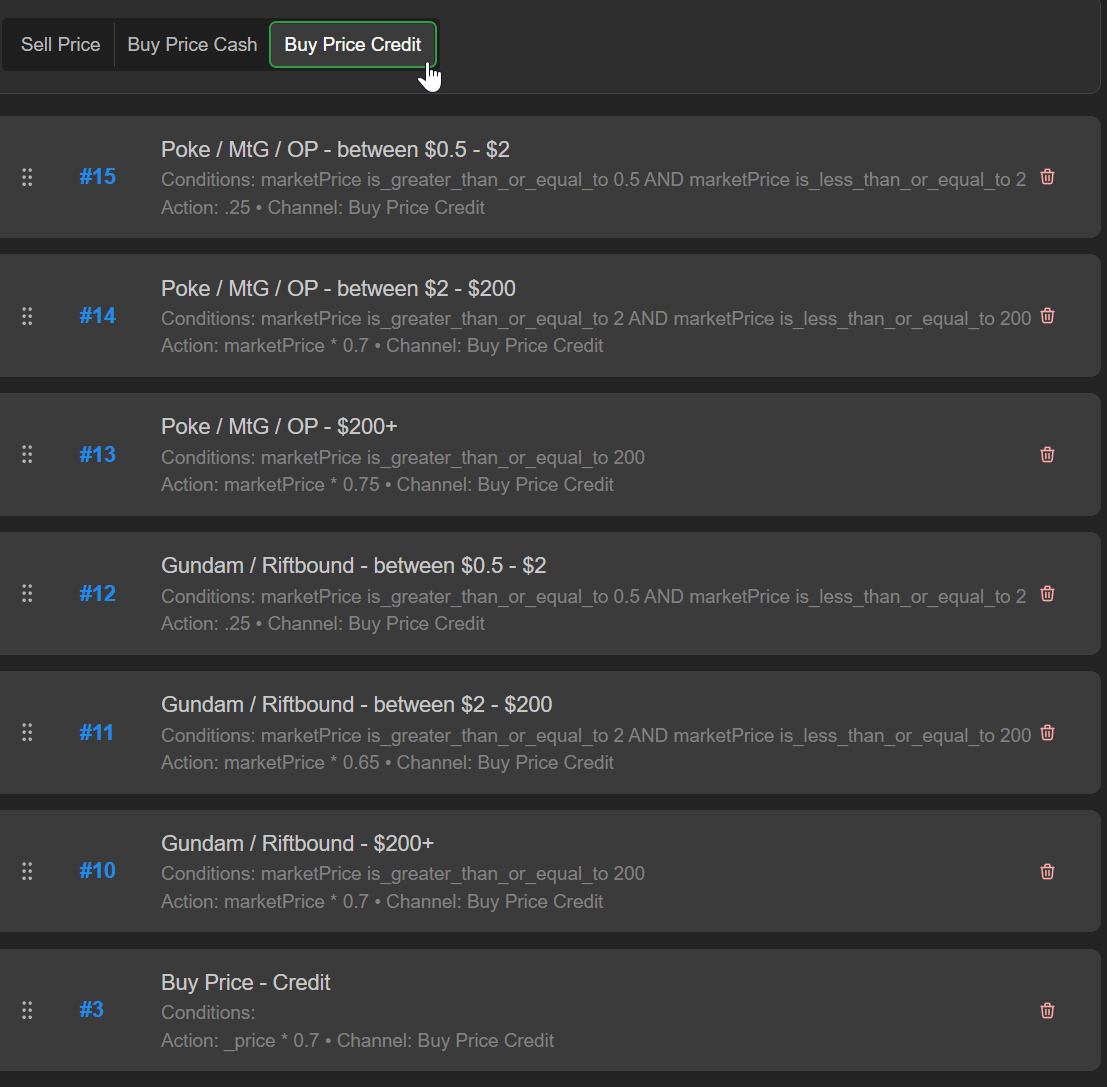
Above example:
Customized channel of game-specific rules for trade-in pricing
Important:
Rule checks trigger top to bottom. It's best practice to place your most specific rules toward the top. Global catch-all rules should generally be placed near the bottom. In the above example, Rule #14 will never trigger for those groups of singles at market value $2.00, as rule #15 will catch it first. Rule #14 will trigger at $2.01 up to $200. This creates the same issue for Rule #13. This is a minor example of an often overlooked and potentially serious rule overlap scenario to keep in mind. It's always beneficial to test your rules by checking your pricing details after new rules are made or the rule hierarchy is adjusted..
Creating a price rule:
Click the '+Create Rule' button. A blank rule pane will appear.
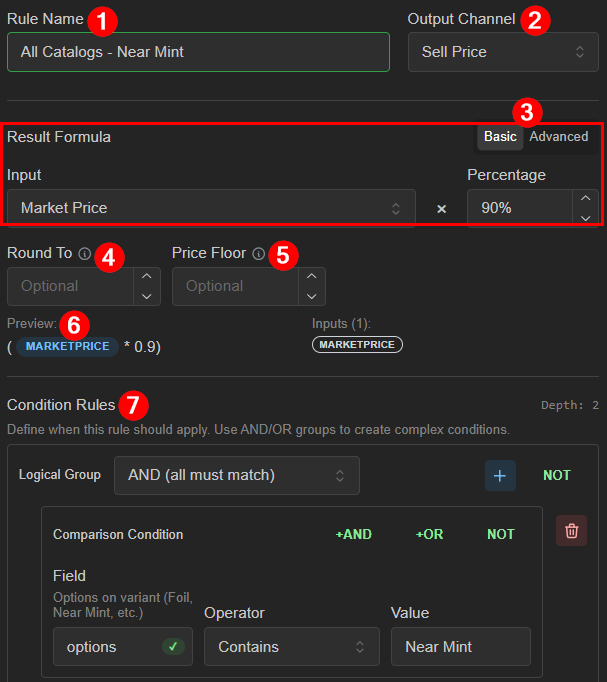
Rule pane info:
- Rule Name - Give your rule a concise and memorable name
- Output Channel - Rule will only affect the selected channel
- Result Formula - Toggle for for advanced mode. In Basic mode, select a pricing category to modify in the 'Input drowdown'. In Advanced mode, you'll be able to view/modify the price rule with a simple integer value (price override) or formula (proper syntax is required)
- Rounding - Rounds the calculated price to the nearest increment before the 'Price Floor' is applied. ex): 0.25 rounds to the nearest quarter
- Price Floor - Applies a minimum final price after rounding. The rule result will never go below this amount.
- Preview - shows the math applied to the input
- Condition Rules - Uses and/or group logic to define when this rule's formula applies (see more below)
Condition Rules walkthrough + examples
Becoming familiar with the field options and compatible input values paired with an understanding of the condition logic will allow you to create rules that can satisfy virtually any selling or buying price preferences your store may need
Complex condition rule example:
Many rules don't need to have many conditions to achieve the results you want, but the image below covers a few things with one example.
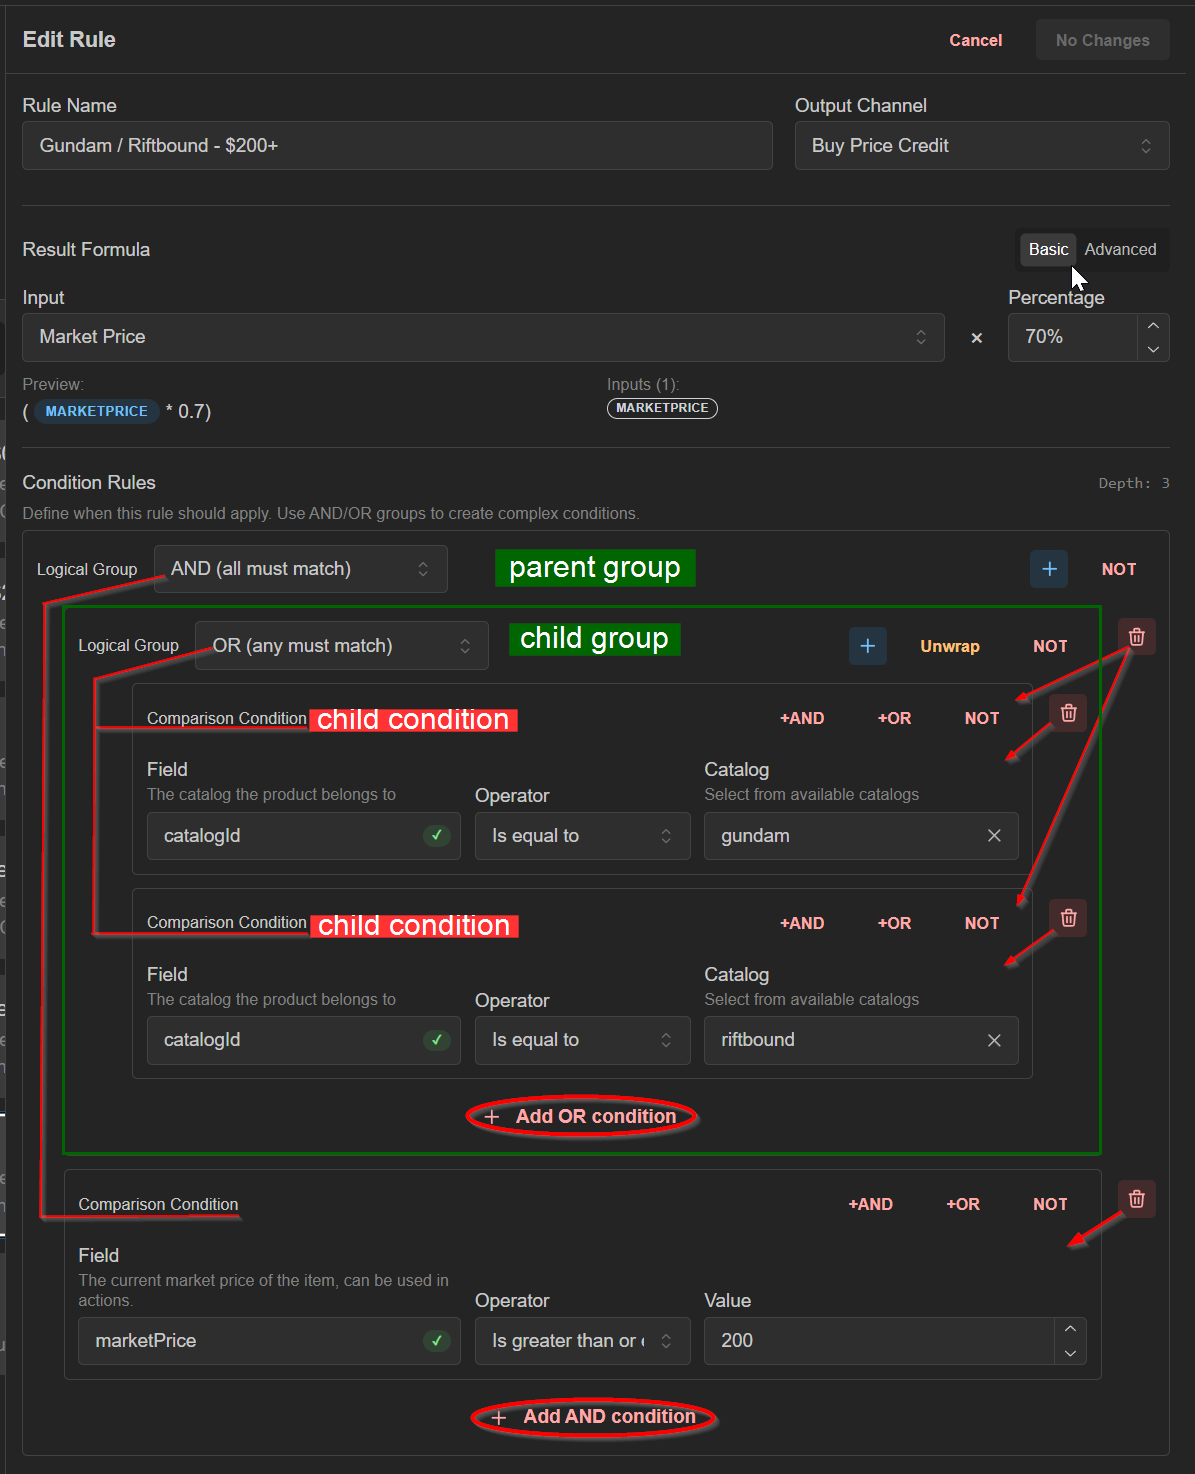
This is a lower complexity advanced rule that sets one's store credit buy price for all Gundam or Riftbound singles to 70% of market, so long as those singles have a current market value of $200 or more. The structure might intimidate you at first, but condition rules are powerful, versatile, and will be at your disposal in no time!
^
Logic observation for this rule:
- Name is unambiguous to staff if others have authority to modify and arrange rules
- Proper output channel is set to buy prices for store credit only.
- Market price (input) chosen and 70% (percentage) of input is set (setting this to 'Sell price' instead will consult your selling prices, and is often the best choice for your Buy rules). will be applied to the condition group(s) below (if necessary, toggle can be switched to Advanced to set a static price, or properly formatted formula)
- Proper initial parent group (either AND or OR) set to AND because two child groups below will have to agree for rule to trigger.
- First child group set to OR, because any of the child conditions within are allowed to satisfy the requirements of this first group. In this case, one condition is the catalog ID (field) is chosen, is equal to (operator) Gundam (catalog), and another OR child condition is added for the Riftbound catalog. If the child group's logic were set to AND, nothing would match, because there are no Gundam AND Riftbound products
- Second child group (near bottom) only contains the condition that the market price (field) is greater than or equal to (operator) 200 (value).
- The rule has been saved (top right) and is ready to be arranged in the Buy Price Credit channel hierarchy.
Hint:
Rule checks trigger top to bottom. Place your more narrow rules (ones that target a specific catalog, value range, etc) toward the top. Global catch-all rules (singular conditions) should generally be placed near the bottom.
Creating a 'category line item' rule (often for 'bulk')
There are a few strategies to implement non-itemized category rules, but we'll cover the most popular method which doesn't utilize a synced catalog. This will treat all specifically classed products as a quantity of a singular line item. This enhances the customer, staff, and store experience overall by not dealing with potentially extensive lists of very low value product
When buylist products you accept aren't processed individually, you'll want to take advantage of custom products. Simply create a product as the 'stand-in for every variant of a specific group of products, then, try this pricing rule:
- Click '+ Create Rule'

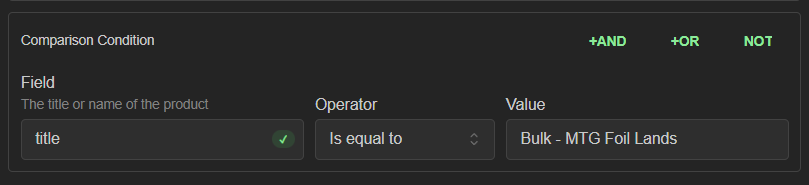
- Add a single condition for 'Title' 'is equal to' '(title of custom bulk item being represented)'
- Set your formula input to Sell Price at 100%.
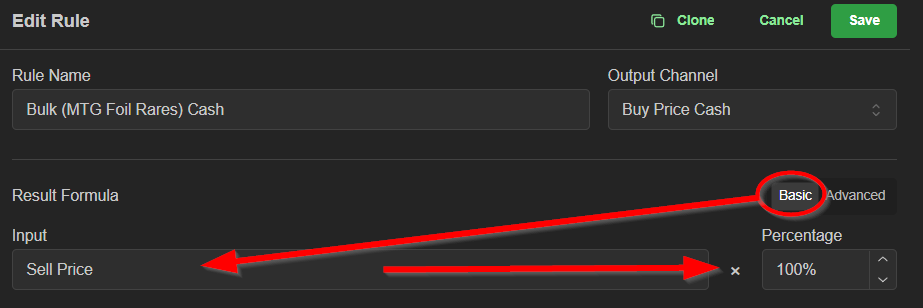 This is for when/if you change the price of the line item in HQ, it will automatically reflect in your point of sale and webstore buylist. In case you also sell bulk, then of course you wouldn't want to use 100% of the input
 - Name the rule, ensure the proper output channel is selected, and click 'Create Rule' to save and update immediately
- Repeat steps 1-4 for each category product you needrepresented in your store's default catalog.
Tips:
Haven't created your category line items yet? Visit this Products article!
Haven't created your collection for category line items yet? Visit this Collections article!
Creating a static 'low value' product rule
When buylist products you accept are still processed individually and not quite 'non-itemized 'bulk', try this static pricing rule:
- Click '+ Create Rule'

- Create a condition rule at the bottom and choose the pricing factor, operator, and value that triggers this pricing rule. In this example we're using two 'Sell Price' fields for the main factors. 'Market Price', 'Mid Price', or 'Low Price' could also be used.
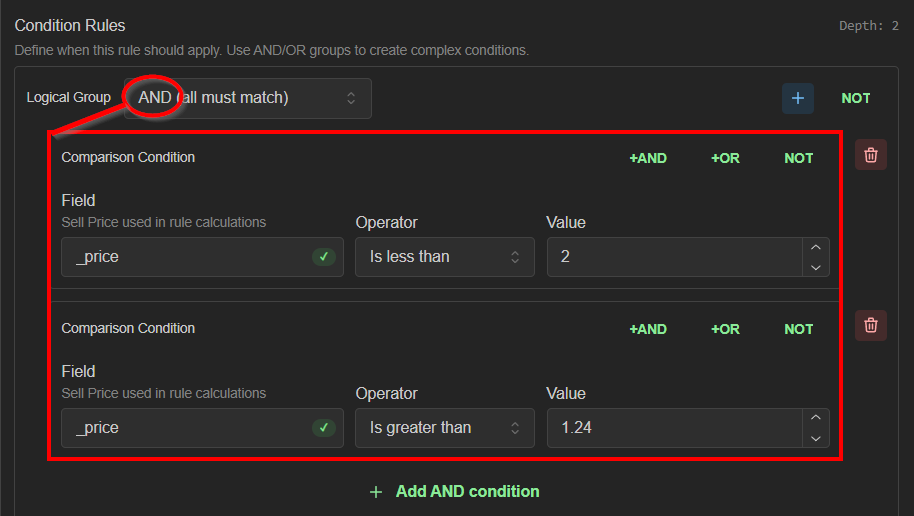 This reads as "If my sell price is less than $2.00 and greater than $1.24"Add any other fields to further specify what class of products this rule applies to, or leave as is for a 'blanket' rule
 - Switch the formula toggle over to Advanced and enter your static buy amount; in this case it's 0.25, or a quarter dollar.
 That's essentially all there is to it. If a product in your system is priced between $1.25 and $2.00, you'll offer 25 cents for it in your buylist.
 - 'Create Rule' at the top to save; the rule is now active.
a closer look: more conditions
Let's look at an alternative to this rule that offers more flexibility for triggering the rule above
With two additional conditions and use of logical groups, we've built a value range scenario that now reads as
"If the market price or my price is between $1.25 and $2.00, trigger the rule formula."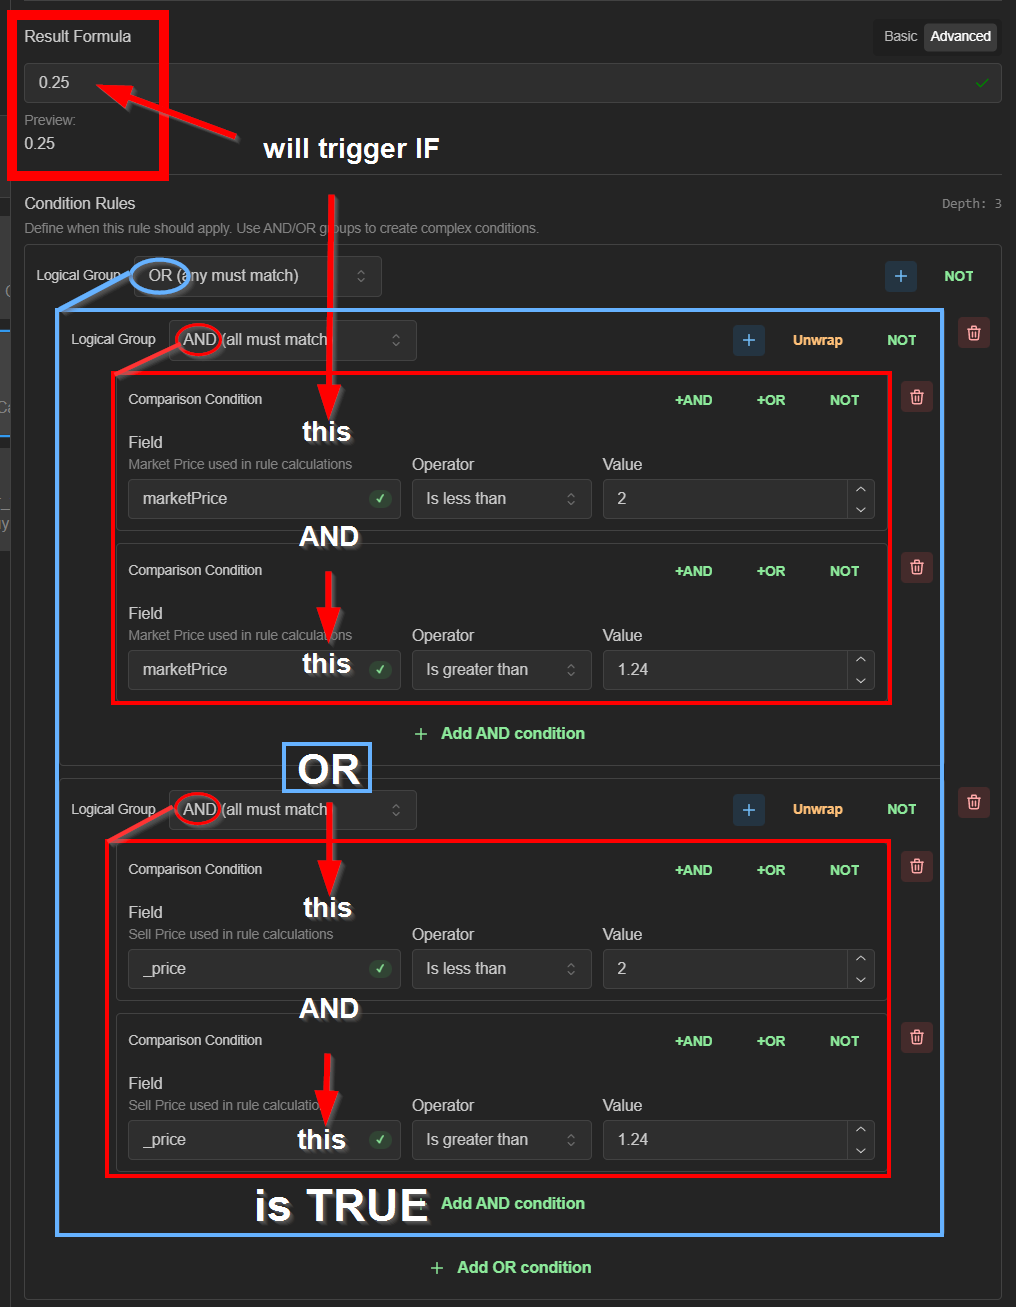 This creates a little more wiggle room for triggering the price formula.
 - Set the formula toggle to advanced to input raw math instead of a percentage of a price channel. In this example we're using 0.25, a quarter dollar.

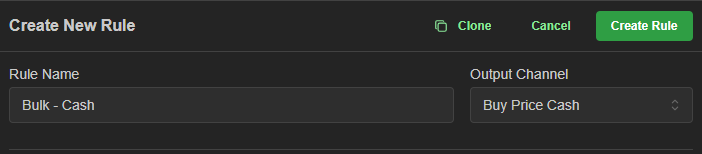
- Name your rule, ensure the proper 'Output Channel' is selected, and click the Create Rule button to save and update your rules immediately
- (optional) Add a 'Catalog' condition if you have specific bulk rates per game. In this example, we're applying this bulk rule only to the Pokemon catalog.
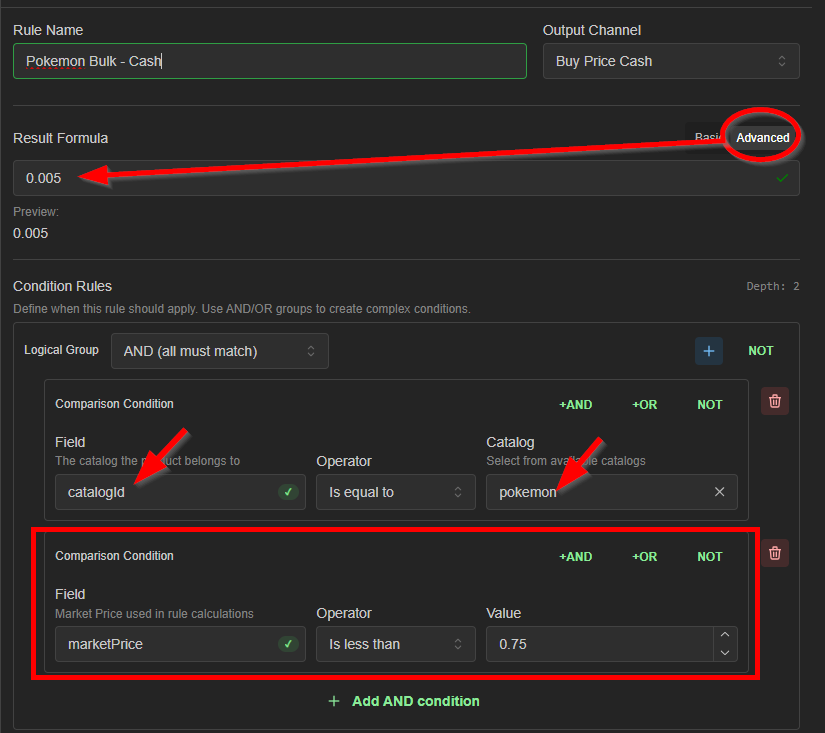 0.005
0.005 - Don't forget to save any changes made
 Tip: To quickly make a counterpart to this rule, click the 'Clone' button to duplicate the rule instantly.
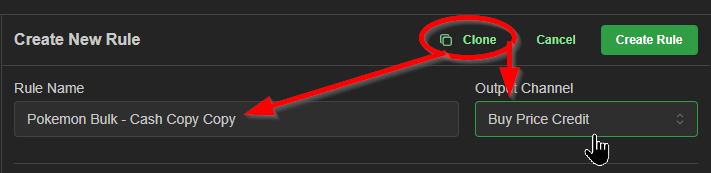 Just change the output channel, modify the formula, and click 'Create Rule' to save time
on building again from scratch! It's a lifesaver on rules with many conditions.
Creating a 'purchase limit' rule:
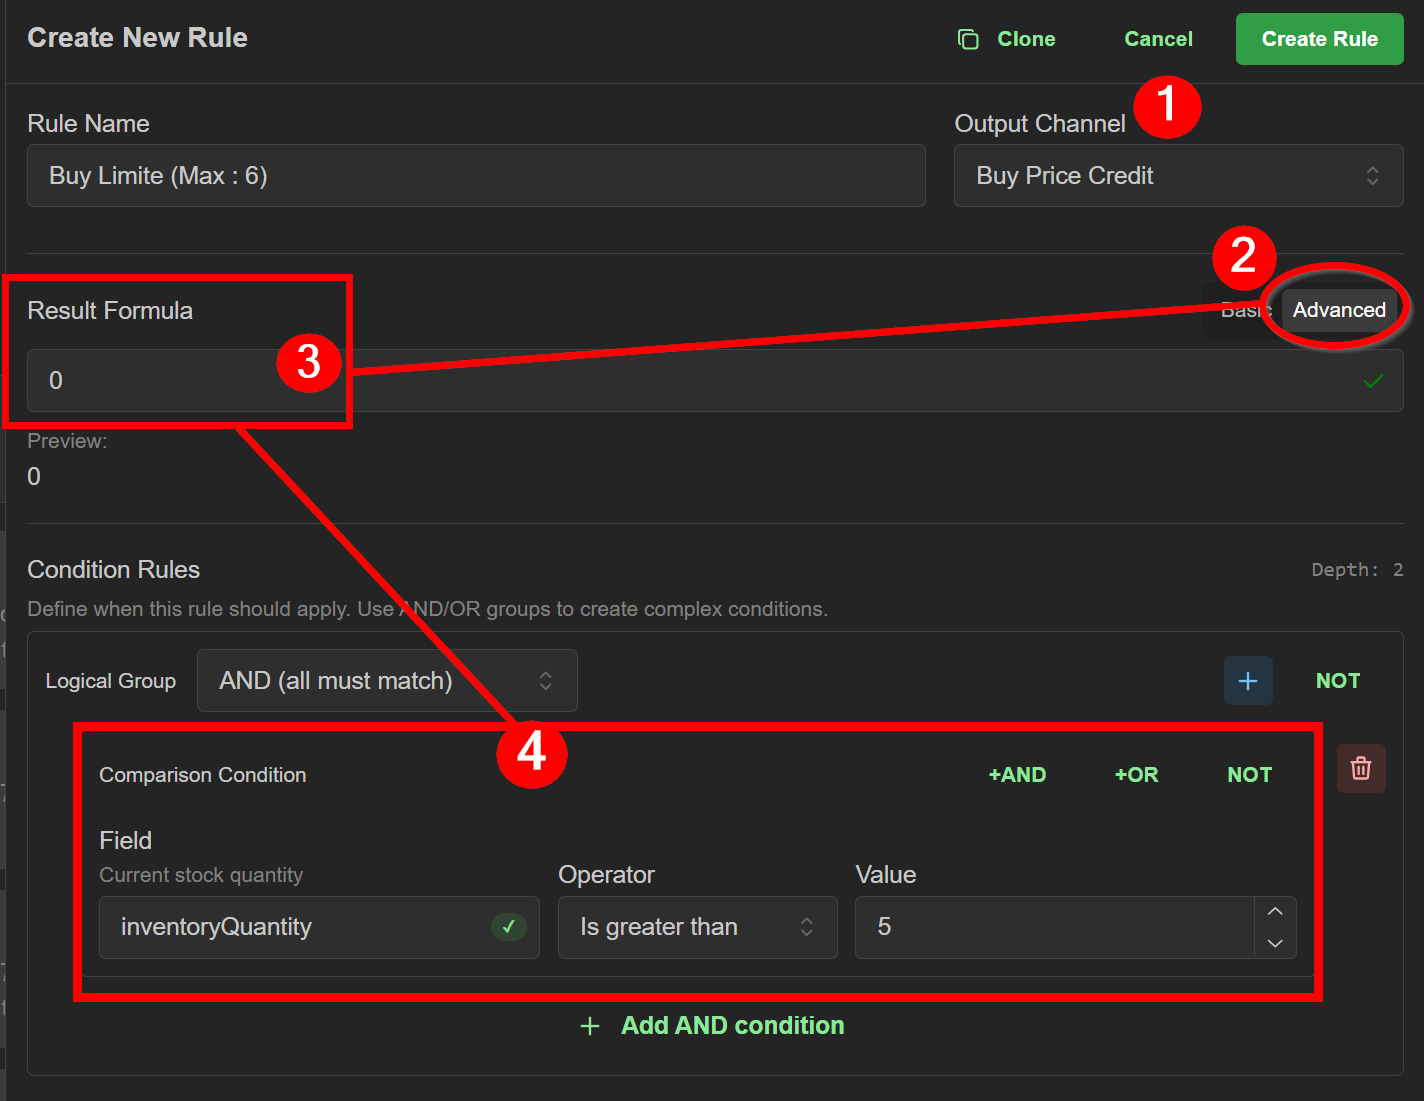
When you don't accept product you have too much inventory quantity of already, create a rule with these parameters:
- Verify the output channel is set properly (Cash, Credit, Webstore)
- Toggle the 'Result Formula' mode to 'Advanced'
- Enter a '0' in the formula field (items priced at 0 are unavailable for sale or trading)
- Add a condition field for 'inventoryQuantity' and choose a desired 'Operator' and 'Value'
- (optional) If needed, you can make this rule specific to a game by just adding the 'Catalog' field as another condition.
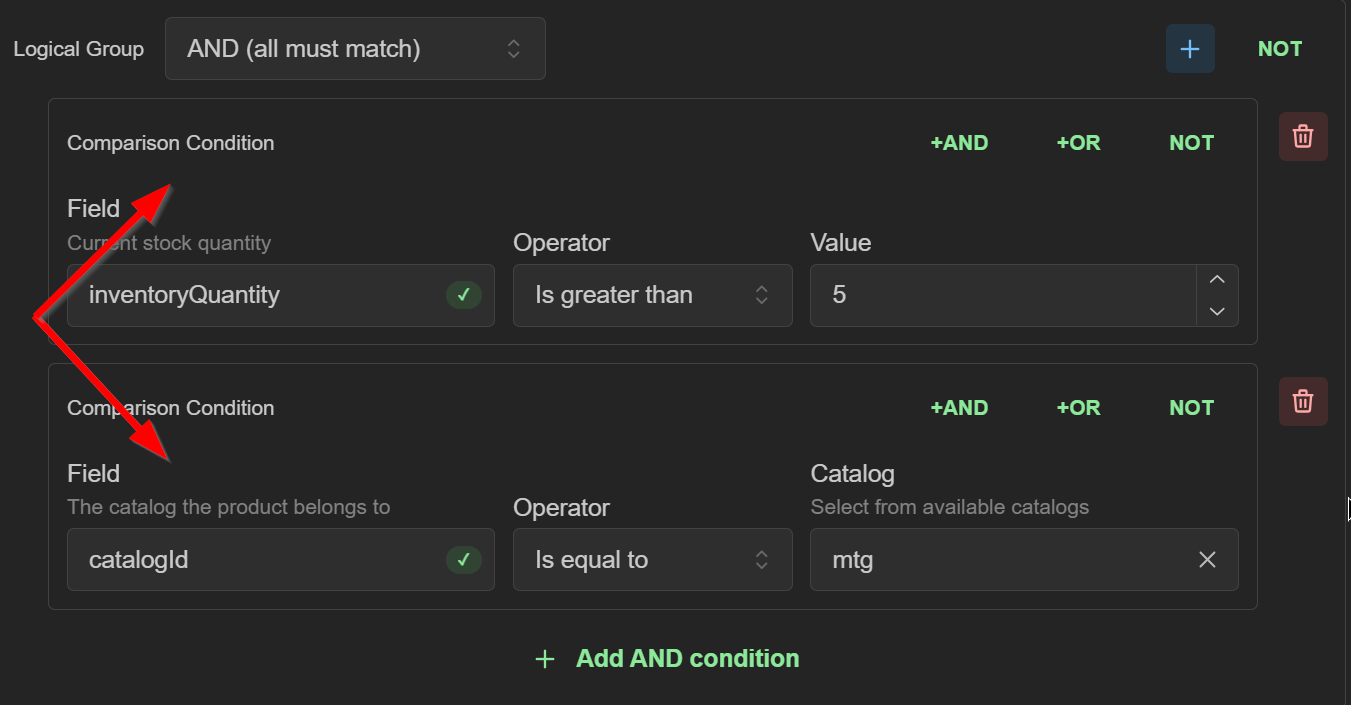 Now this rule only limits your buys of Magic singles
 - Click 'Create Rule' to save and update your rules instantly

Factors and functions (for advanced result formulas)
Understanding how the popular factors and logical functions operate, you'll be able to take advantage of complex calculations that will drive your store's unique and dynamic pricing. If you've used application like Excel, Numbers, or Sheets before, then you may already be familiar with their behavior and relation to each other.
Commonly used factors:
Inventory Quantity: inventoryQuantity
The current inventory count of the item. Can be used in actions
Low Price: lowPrice
The lowest price of the item in the market. Can be used in actions
Market Price: marketPrice
The current market price of the item. Can be used in actions
Mid Price: midPrice
The median price of the item in the market. Can be used in actions
Sell Price: _price
The price output of the rule. Can be used in actions
Commonly used price functions:
Ceiling: ceilTo(
Rounds a number up to the nearest multiple of a specified factor. If no factor is provided, it rounds up to the nearest integer
example of price floor of .50 and rounded to nearest .25:
max((.50), ceilTo(marketPrice * 1.1, 0.25 ))
First: first(
Returns the first non-null, non-undefined, non-empty, non-zero value from the provided arguments
Floor: floorTo(
Rounds a number down to the nearest multiple of a specified factor. If no factor is provided, it rounds down to the nearest integer
Maximum: max()
Returns the maximum value from the provided inputs
Minimum: min()
Returns the minimum value from the provided inputs
Round: roundTo()
Rounds a number to the nearest multiple of a specified factor. If not factor is provided, it rounds to the nearest integer
Was this article helpful?
That’s Great!
Thank you for your feedback
Sorry! We couldn't be helpful
Thank you for your feedback
Feedback sent
We appreciate your effort and will try to fix the article