ShadowPOS makes selling your store’s products effortless. It’s just as intuitive for buying items or taking trade-ins from customers. Whether you’re selling or buying inventory items, creating custom sale items on the fly, or finding that last piece to complete a customer’s cart, ShadowPOS handles it all with clarity and ease.
Visit Point of Sale > Point of Sale
We'll cover the following operations:
- Opening/closing the till session
- Selling and buying
- Completing the transaction and taking payment
- Using Item Actions (reviewing price details, etc.)
- Using customer store credit and loyalty points
- Viewing Kiosk; Cart History
- Creating discount codes
- Printing a cart tally / price quote
- Processing buylists (visit 'point of sale' menu > 'buylists' page)
- Processing returns / issuing refunds (visit 'point of sale' menu > 'orders' page)
Opening/Closing the Till Session

To operate the point of sale, your till must be open:
- Ensure the proper till (and store) is selected in the till menu.
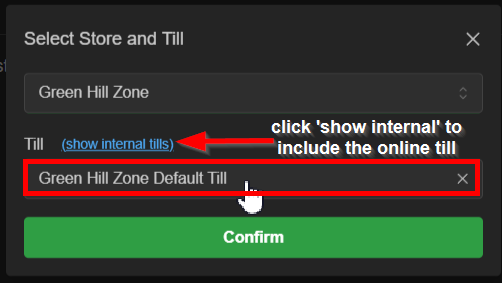
- Click the green handbag icon in the top right, and specify your store's opening tender amounts.
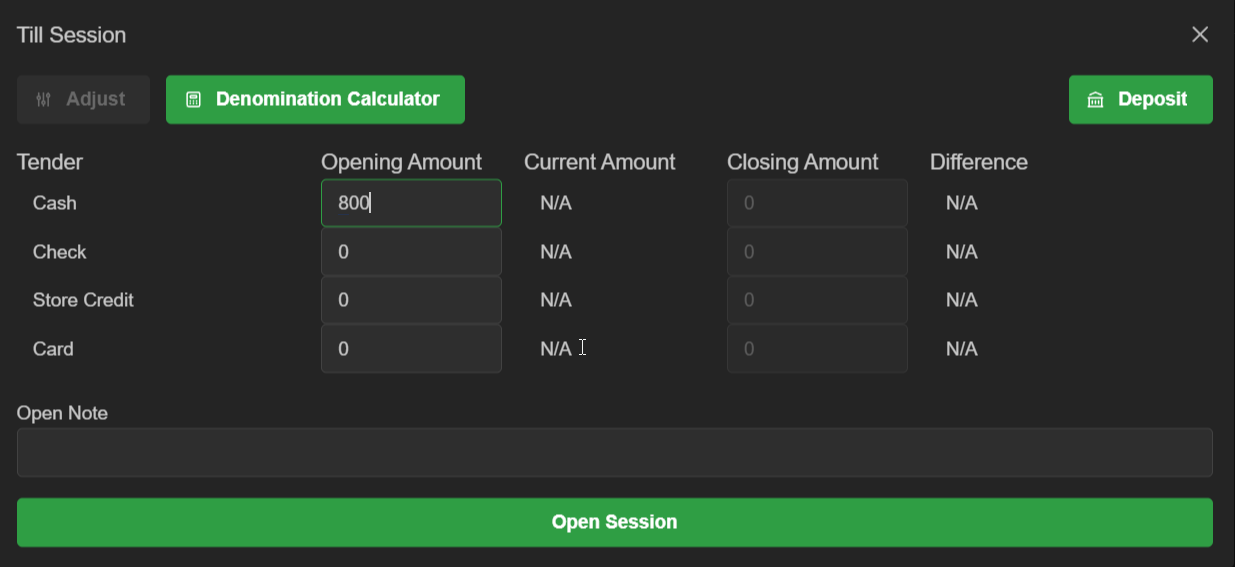
- Click 'Open Session' to begin using the Point of Sale.
- At the end of a typical business day, close the till session in the same way.
Notes:
-The online till must be open to enable webstore sales
-Closing a session with a drawer count discrepancy will issue a warning notification.
-It's highly recommended to close your physical till sessions at the end of business each day. Extended till sessions (30+ days) can cause increasingly sluggish behavior in HQ until the session is closed and reopened.
at a glance
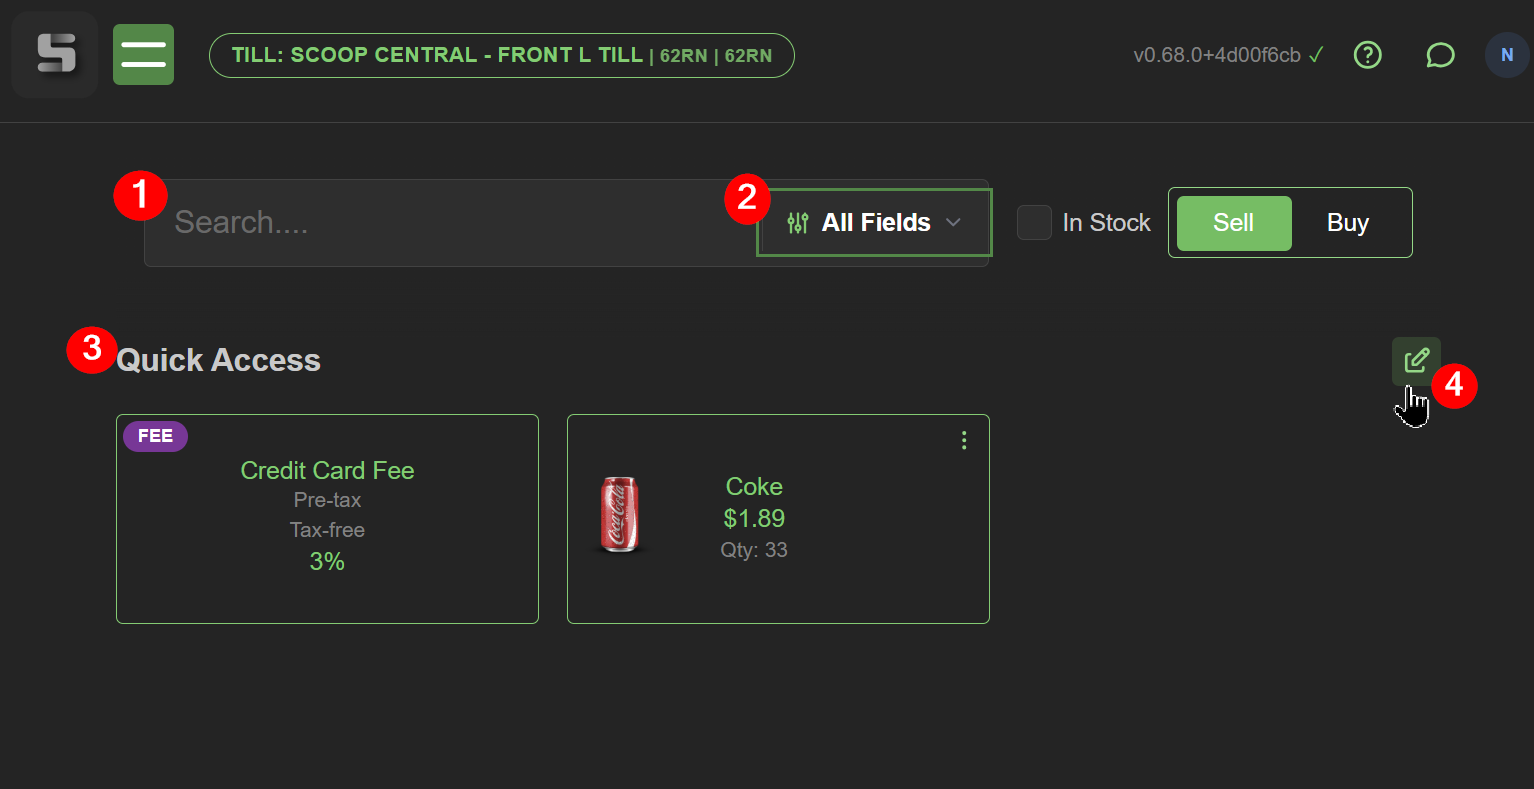
- Searchbar: Search partial or full titles, barcodes, card set id, tags, etc.
- Search Field: Filter the search field by title only, title and set, or within collections
- Quick Access: Shortcuts: Quickly add common / popular items to the cart
- Edit Shortcuts: Click to edit/add items, fees, or subfolders to the Quick Access menu.
Selling and buying
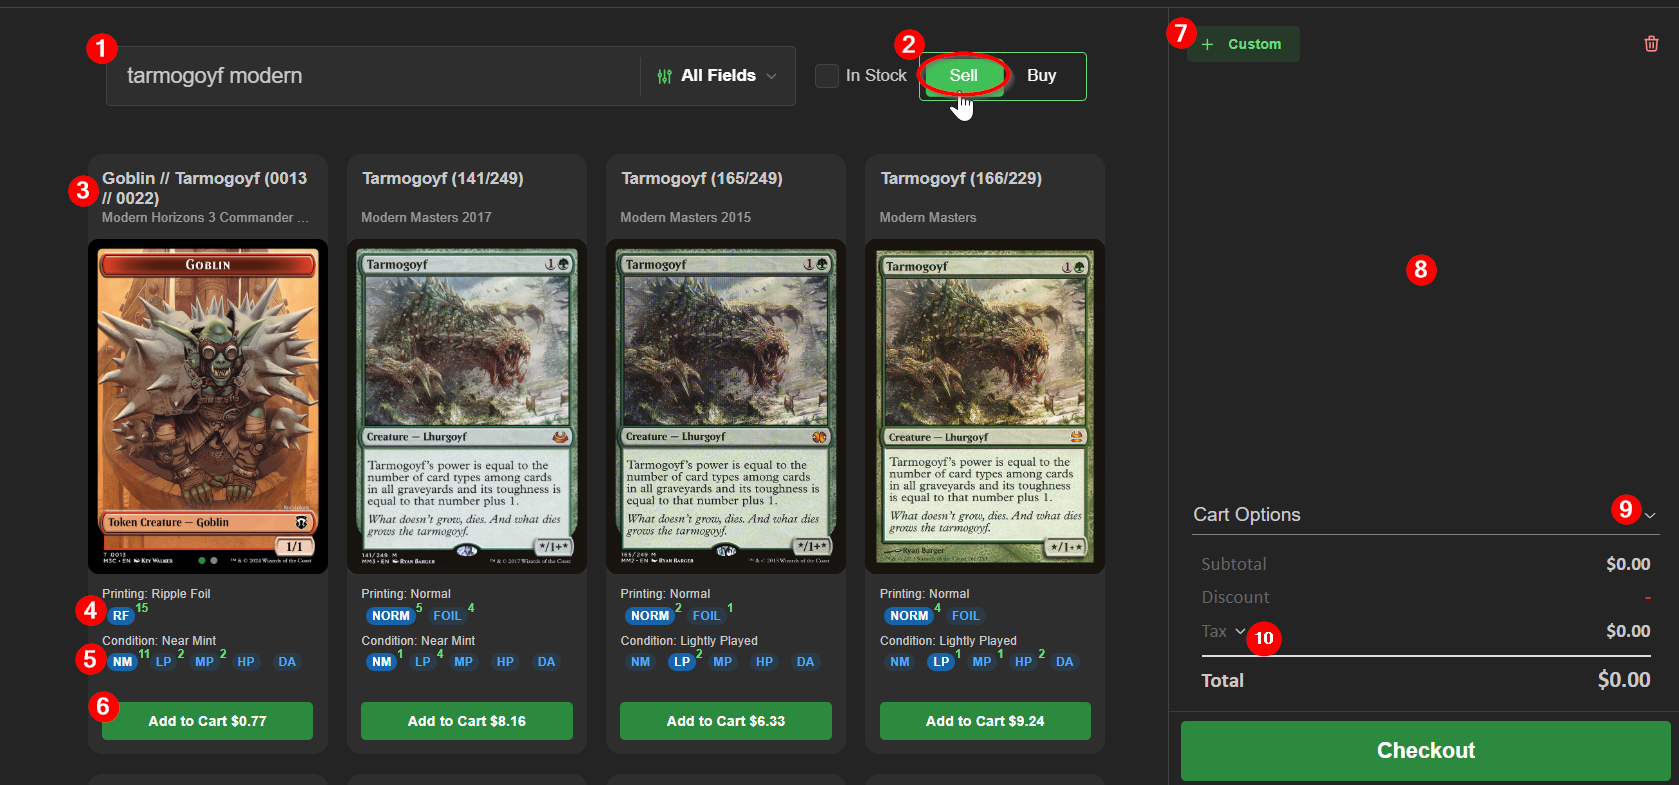
Add product to customers' cart either by name search and selection, or by scanning its label (with supported HID scanner). When using the manual search method, the quantity of each variant in-stock is indicated next to the variant bubble. New custom sale or buy (traded-in) items may also be added to cart on-the-fly by clicking the '+ Custom' button (7), located in the cart (8) on the right.
- Search / scan
 Use your barcode scanner to add items to cart, or search to add from the search box. This will search all subscribed catalogs for product and tags matching your input. check 'In Stock' to view only currently on-hand items. Choose how narrow the search field is by using the field dropdown to the right.
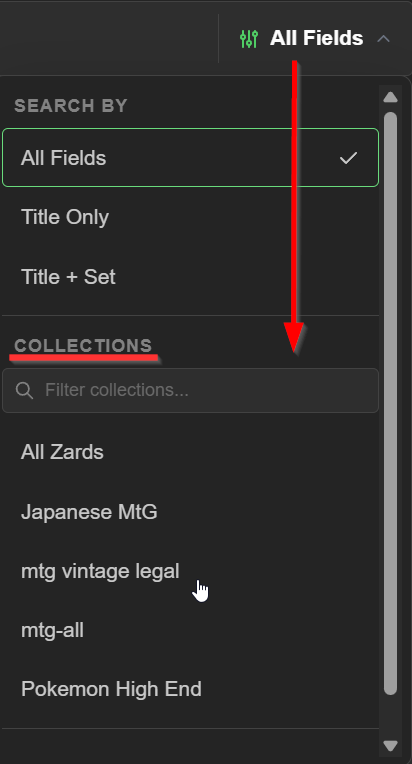 If you have various collections configured, they'll appear here as a search filter too
Tip: After adding product from a manual search, you can press / to jump back to the search box to speed up additional searches. - Toggle for buying
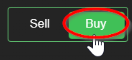 You can switch the toggle to the right of the search field to change your intent from a sale to a buy (trade-in). This affects the search actively. When buying, the 'Add to Cart' button displays the cash buy (left) and trade-in values (right)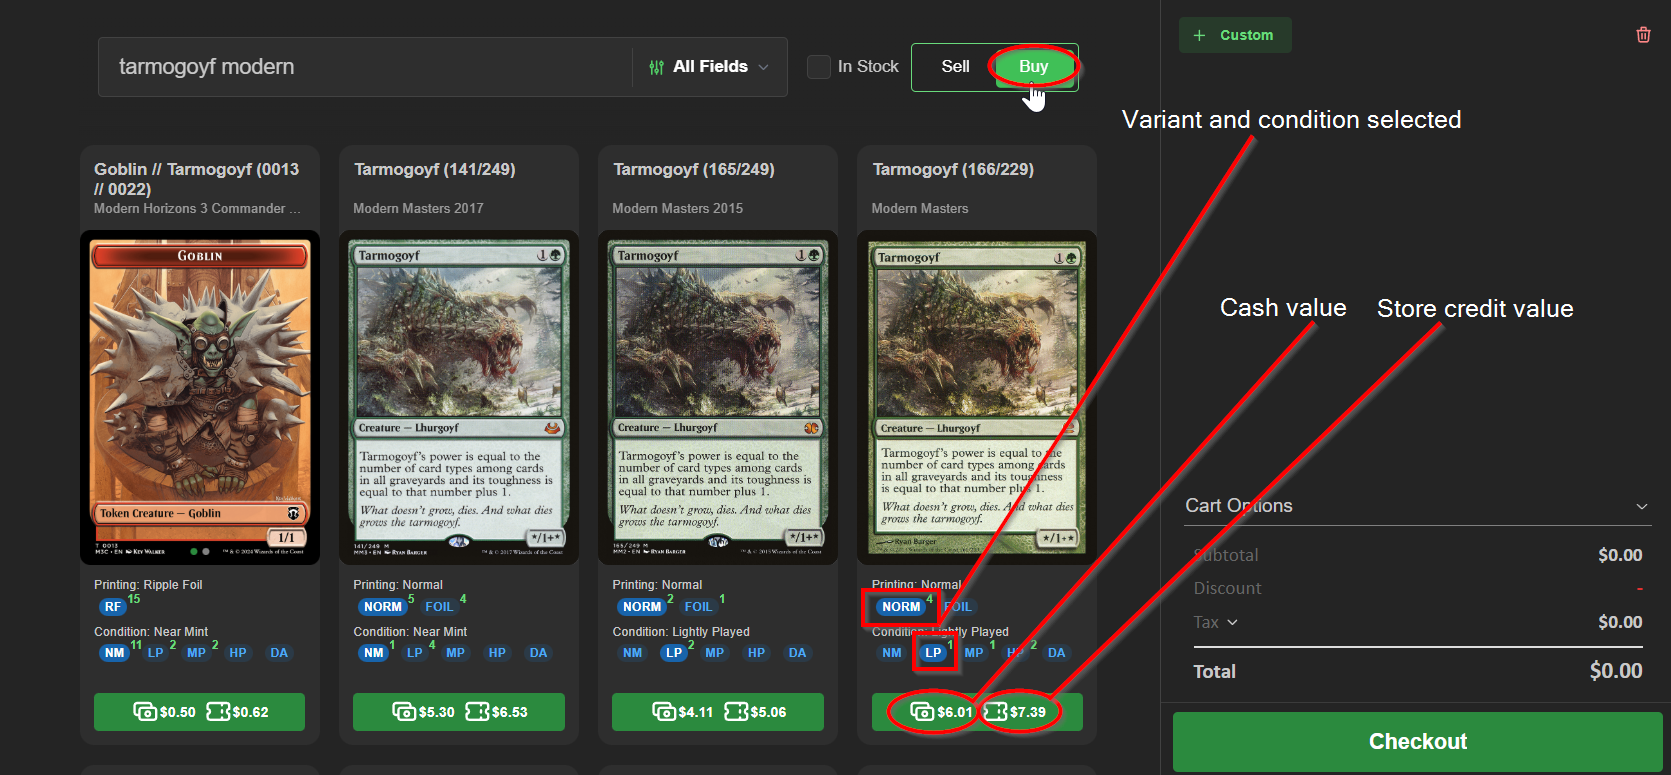
- Item info card
Displays the title, set name, variant, condition, and quantity of product on-hand. Hovering over the info card displays additional actions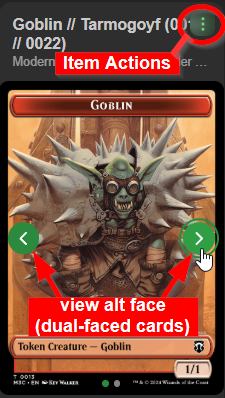
see also 'Item Actions' section below - Optional variants
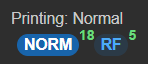 Selected variant bubbles are highlighted in a lighter color with white text.
 - In-stock quantities
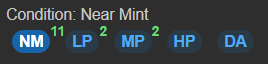 In-stock quantities are denoted by a number in the bubble's top right corner.
 - Add to cart
adds your sale or buy item to the cart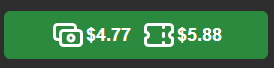
- + Custom
allows you to sell or buy a custom product unique to this cart. These are not products you have represented in inventory. Items purchased from customers this way are taken into the system as 'Custom Line Item'; the title and price input here is for reference only. If you intend to resell something bought this way, be sure to create a product for it.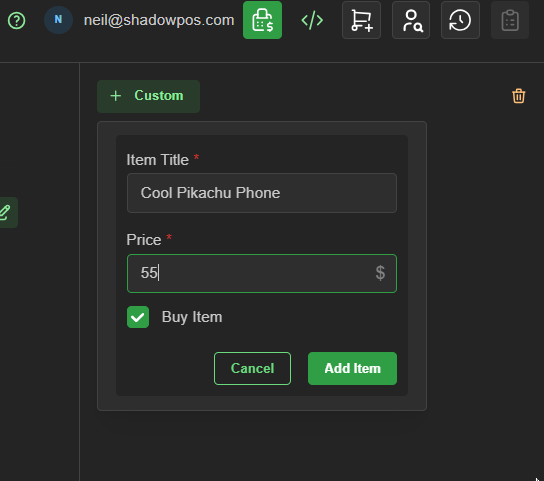 Note: Custom sell/buy item COGS are always $0 (unless modified in the store settings).
 - Cart
Items you're selling and/or buying will be displayed here. Buy items will be accompanied by cash and store credit value buttons, and have a vertical 'buy' banner displayed to the left of the item for disambiguation.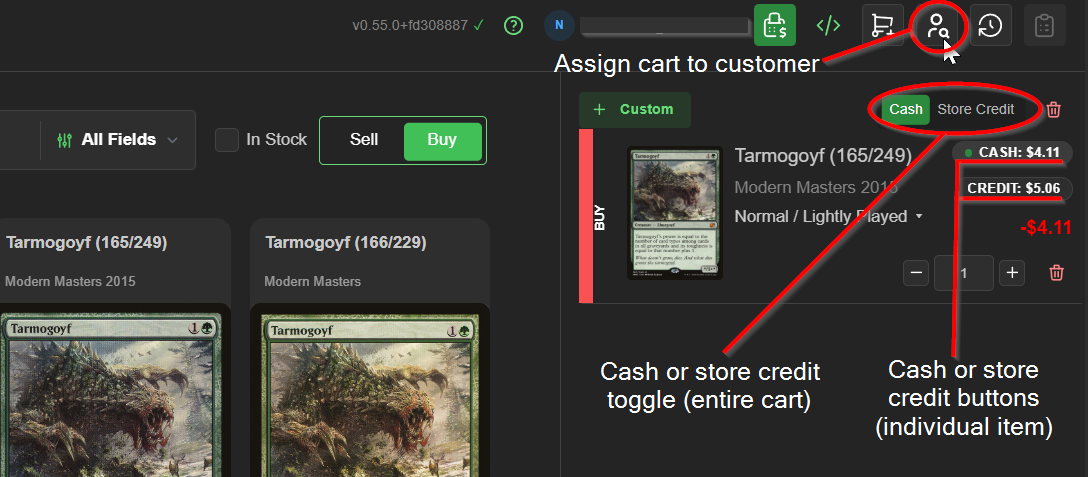
For sale items, you can apply special discounts per item using the 'Options' dropdown, including percentages, dollar amount, and whether the item is tax free or not.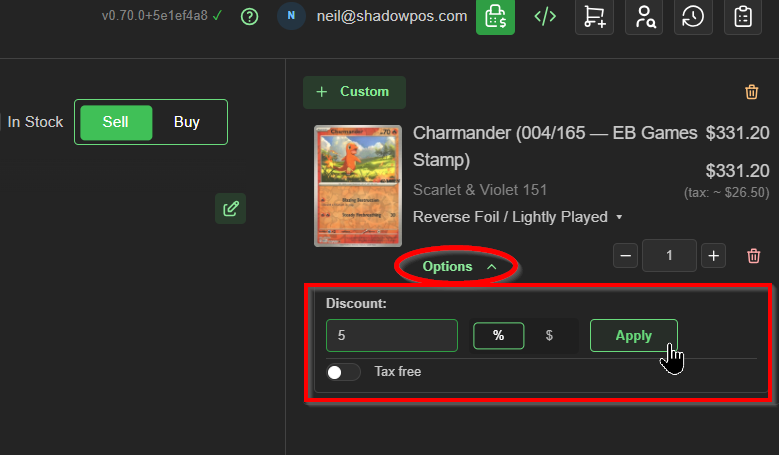
- Whole Cart Options dropdown menu
Here you can tick an option to have every item in the cart show its total price with tax included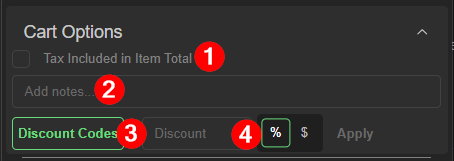 (1) Tick to show the tax inclusive price next to each item in the cart
(2) Notes input here will appear next to the Order ID in Point of Sale > Orders
(3) Click this button to choose the applicable discount code from a dropdown menu. These discounts apply to the entire cart. Discounts applied this way are in addition to the optional cart discount
(4) This is an on-the-fly entire cart discount. Enter an integer amount in this box and toggle whether it will be a percentage or dollar discount. Discounts applied this way are in addition to optional discount codes (3).
see also 'Creating discount codes' section below - Tax breakdown dropdown
Clicking this dropdown will show a breakdown of each applied tax percentage and amount charged per rate.
Completing the transaction and taking payment
Once all product is accounted for in the cart, click the Checkout button to proceed.
On the checkout page, you'll see all tenders you have associated with the till you are currently using populated on the left side of the screen. Selecting the tender-titled side of a button will prompt manual entry of payment amounts, while selecting the 'Quick Pay' titled side of the button will automatically assign the entire remaining payment owed to that tender type. 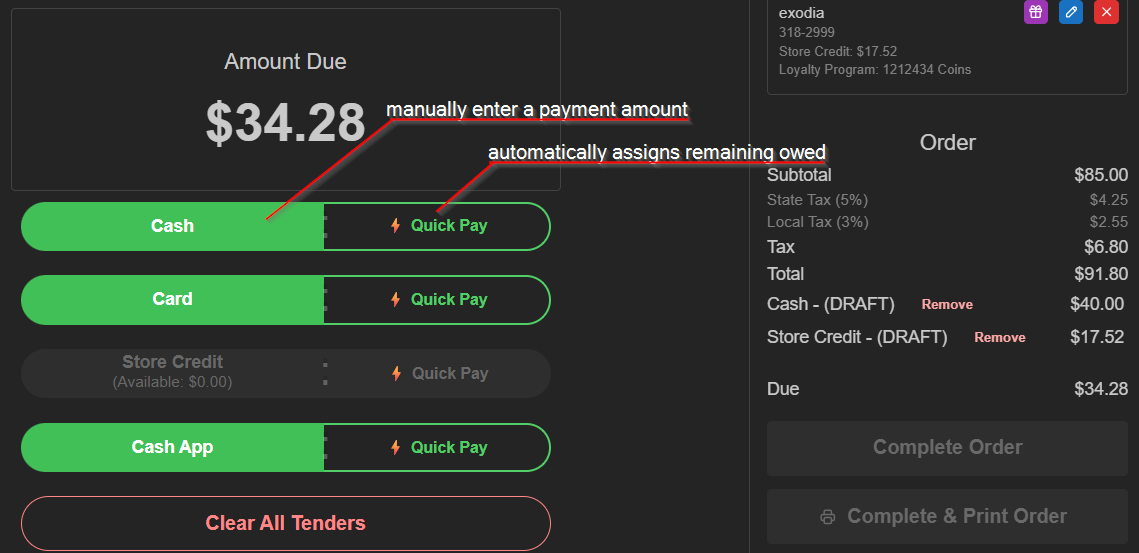 Once the cart balance owed is satisfied by your payment selections, choose a desired completion method. The transaction is now processed and will appear in the Orders page (Point of Sale > Orders).
Using Item Actions (reviewing price details, etc.)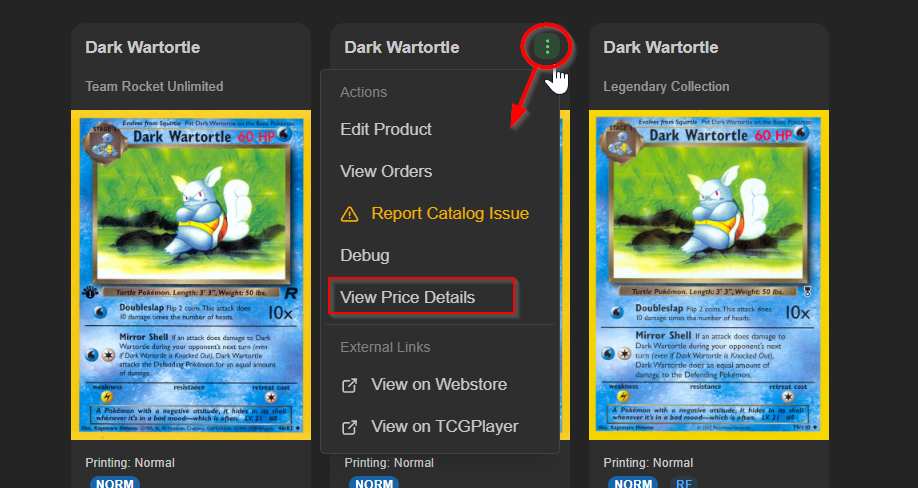
Item Actions allow you to conveniently investigate inventory or pricing discrepancies, and more. Hover over any item info card to display the '...' Action button. Click to display the Actions menu. Choose to edit, view orders that included this variant, report catalog issues, open external links to reference this variant on external sites, or review your store's pricing (rule-derived details) for this variant (see more below)
Price Details pop-up
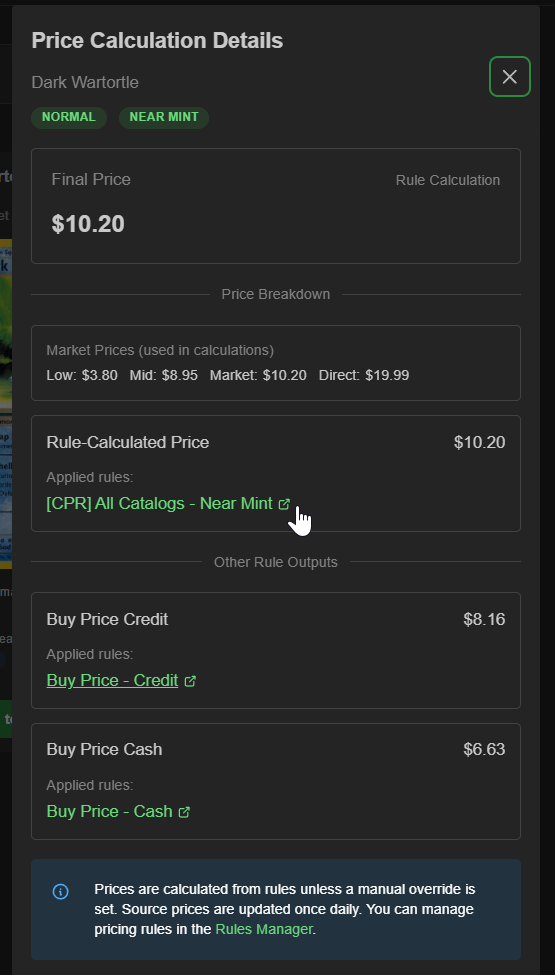
Here you can quickly review the current market pricing ranges and your store's price rules.
You can view/edit any rule by clicking the links to visit those pages.
Note:
Editing price rules affects every product in that group. A price override (done on the Edit Product page) may suffice for singular product, or as a one-time transaction exception if done in the cart
Using customer store credit & loyalty
Store credit is spent during the checkout process, but if needed, adjusting prior to checkout is possible after selecting the customer to associate with the cart.
Your customers may spend accumulated store credit from their balance in your store's ledger to pay for products in-full or partially in conjunction with other payment methods.
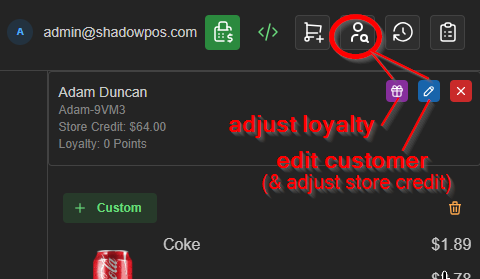
Loyalty Points are 'exchanged' manually in ShadowPOS. They can be adjusted for virtually anything. The loyalty program currently works by adjusting loyalty values to fit your redemption policies. Although it isn't an automated process (currently), it remains versatile!
Whether adjusting through the point of sale or via the 'Customers' page, the 'reason' field must be filled, so tracking of points (and store credit for that matter) is appropriately documented for accounting reference.
Note:
You must have the Loyalty Program enabled and configured before points can be issued or accepted.
( Menu > Customers > Loyalty Settings )
Viewing kiosk orders; Cart History

Putting a cart on hold while you check out another customer may be necessary at times. You can simply click the +cart image icon in the top right to begin a new transaction with a fresh cart. This action effectively suspends the previous cart in Cart History, and can be recalled at any time by clicking the clock image icon in the top right, and selecting the desired cart from the 'Open' tab. Cart History is also the primary way of viewing your kiosk orders without leaving the point of sale screen
Carts are always saved in their current state when starting a new one. Carts can be recalled on another till if desired.
Cart History tabs:
Open
These are all of your carts containing products ready for checkout that haven't been processed yet. Select one to recall it as your active cart.
Submitted
These are all fully processed orders that have been fulfilled
Refunded
These are processed orders that have been fully or partially refunded
Kiosk
These are open carts submitted from a self-serve terminal in-store
Creating discount codes
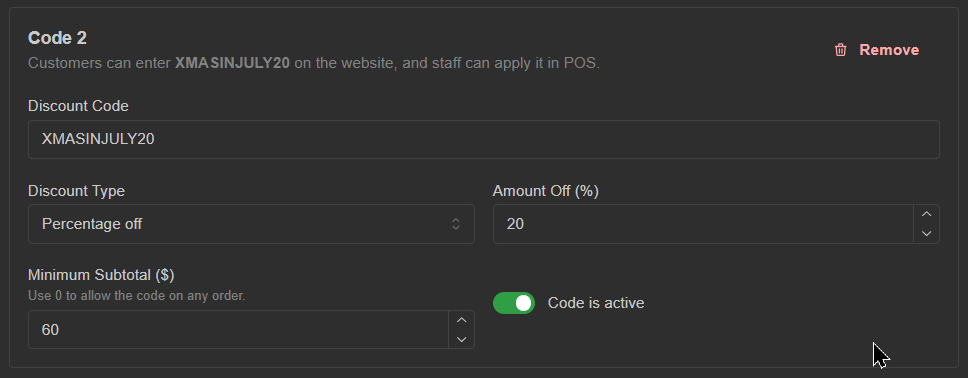
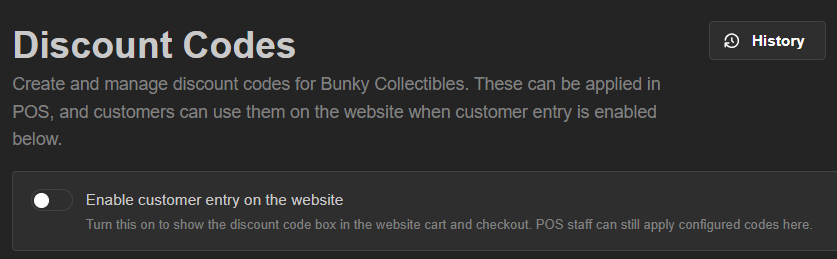
Discount codes are applied in the cart (see above 'Selling and Buying' section), but codes can be created in advance by visiting Settings > Discount Codes
example:
Note the toggle at the top of page to restrict/allow website entry of codes
Printing a cart tally / price quote
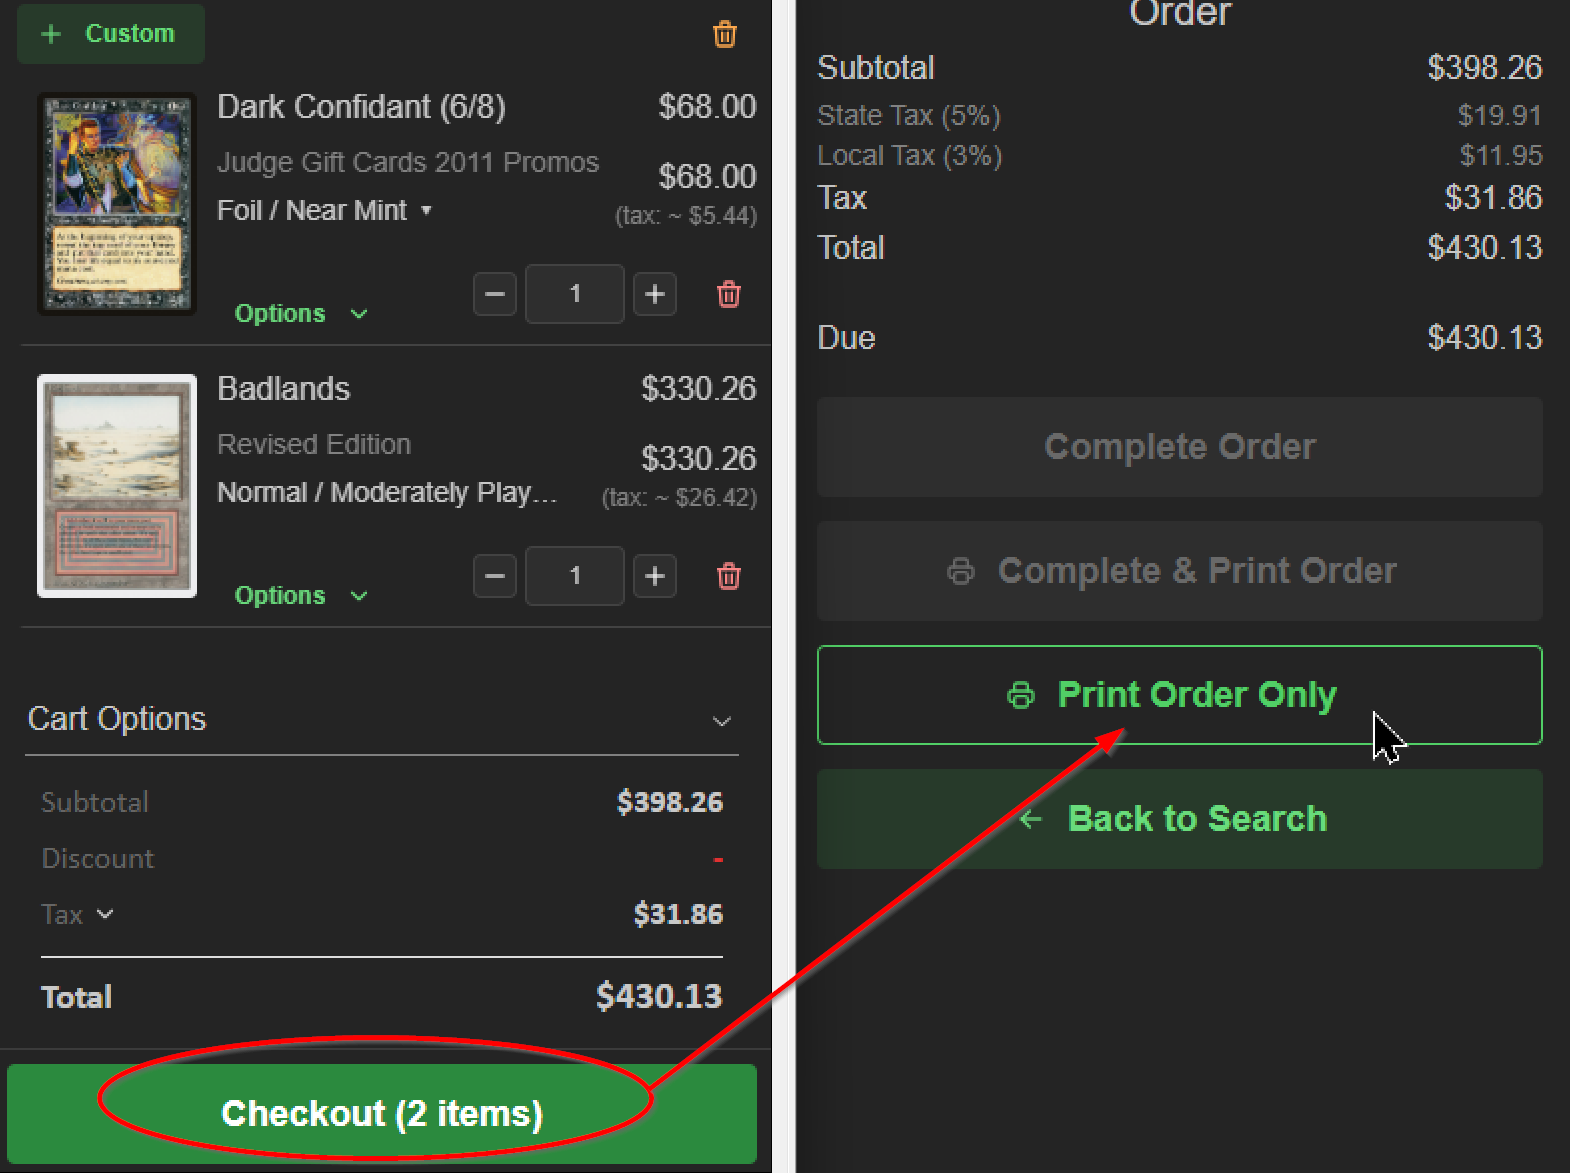
A quick and visually appealing way to provide your in-store customers with a physical price quote or running tally is simply to visit a cart's checkout page and select 'Print Order Only'.
Processing buylists
Navigate to Point of Sale > Buylists
Note:
Web store buylists must first be activated (Settings > Settings > Buylist Configuration button), and collections for buying associated (Menu > Products > Collections ) before they'll appear on your site for customer interaction and buylist building. See Settings for setup details.
Processing returns, exchanges, or issuing refunds:
Visit Point of Sale > Orders to begin the return process
Was this article helpful?
That’s Great!
Thank you for your feedback
Sorry! We couldn't be helpful
Thank you for your feedback
Feedback sent
We appreciate your effort and will try to fix the article